YOLOV8によるANPR
YOLOV8 ANPR
イントロダクション:
YOLO V8は、Ultralyticsチームによって開発された最新のモデルです。精度と効率の両面で従来のモデルを超える最新鋭のYOLOモデルです。
使いやすく、コマンドラインまたはPythonパッケージを介してアクセスできます。オブジェクト検出、分類、セグメンテーションのタスクに対して、即座にサポートを提供します。最近では、オブジェクトトラッキングのネイティブサポートも追加されたため、トラッキングアルゴリズムのリポジトリをクローンする必要はありません。
この記事では、YOLOV8を使用して自動ナンバープレート認識(ANPR)ツールを構築する手順を説明します。さあ始めましょう。
車両の追跡:
先に述べたように、YOLOV8にはネイティブのトラッキング機能が備わっているため、この手順は非常に簡単です。まず、ultralyticsパッケージをインストールします。
- 「データとテクノロジーのリーダーシップの現在の状況- チーフAIオフィサーがチーフデジタライゼーションオフィサーに置き換わるか?」
- 「Pythonデータ構造の基本を5つのステップで始めましょう」
- 「Pythonの基礎 構文、データ型、制御構造」
pip install ultralytics次に、open cvを使用してビデオフレームを読み取り、persist引数をTrueに設定してモデルのtrackメソッドを適用します。モデルは、バウンディングボックスを描画するための座標とid、ラベル、スコアを返します。
import cv2from ultralytics import YOLOmodel = YOLO('yolov8n.pt')cap = cv2.VideoCapture("test_vids/vid1.mp4")ret = Truewhile ret: # カメラからフレームを読み取る ret, frame = cap.read() if ret and frame_nbr % 10 == 0 : results = model.track(frame,persist=True) for result in results[0].boxes.data.tolist(): x1, y1, x2, y2, id, score,label = result # 閾値を満たすかつオブジェクトが車であるかをチェック if score > 0.5 and label==2: cv2.rectangle(frame, (int(x1), int(y1)), (int(x2), int(y2)), (0, 255, 0), 4) text_x = int(x1) text_y = int(y1) - 10 cv2.putText(frame, str(id), (text_x, text_y), cv2.FONT_HERSHEY_SIMPLEX, 0.8, (0, 255, 0), 2) cropped_img = frame[int(y1):int(y2), int(x1):int(x2)]以下は1つのフレームの結果です:
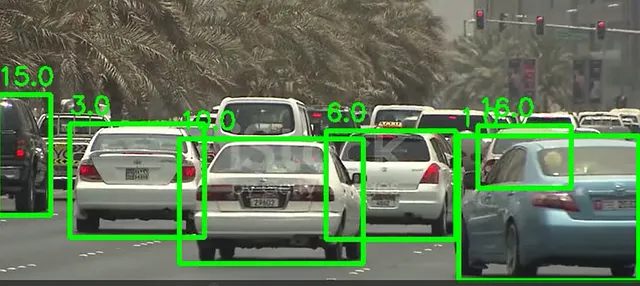
バウンディングボックスの座標を使用して、フレーム内の各車両を画像に切り取ります
ナンバープレート認識:
車両を検出したので、次にナンバープレートを検出する必要があります。そのために、Yoloモデルをトレーニングする必要があります。そのために、以下のKaggleのデータセットを使用しました。
車両ナンバープレート検出
433枚のナンバープレートの画像
www.kaggle.com
ただし、このデータセットのラベルはPASCAL VOC XML形式です:
<annotation> <folder>images</folder> <filename>Cars105.png</filename> <size> <width>400</width> <height>240</height> <depth>3</depth> </size> <segmented>0</segmented> <object> <name>licence</name> <pose>Unspecified</pose> <truncated>0</truncated> <occluded>0</occluded> <difficult>0</difficult> <bndbox> <xmin>152</xmin> <ymin>147</ymin> <xmax>206</xmax> <ymax>159</ymax> </bndbox> </object></annotation>YOLOは、各画像の注釈を次の形式のファイルに必要とします:ラベル、x中心、y中心、幅、高さ
このコードは、データの変換を処理します:
def xml_to_yolo(bbox, w, h): # xmin、ymin、xmax、ymax x_center = ((bbox[2] + bbox[0]) / 2) / w y_center = ((bbox[3] + bbox[1]) / 2) / h width = (bbox[2] - bbox[0]) / w height = (bbox[3] - bbox[1]) / h return [x_center, y_center, width, height]def convert_dataset(): for filename in os.listdir("annotations"): tree = ET.parse(f"annotations/{filename}") root = tree.getroot() name = root.find("filename").text.replace(".png", "") width = int(root.find("size").find("width").text) height = int(root.find("size").find("height").text) for obj in root.findall('object'): box = [] for x in obj.find("bndbox"): box.append(int(x.text)) yolo_box = xml_to_yolo(box, width, height) line = f"0 {yolo_box[0]} {yolo_box[1]} {yolo_box[2]} {yolo_box[3]}" with open(f"train/labels/{name}.txt", "a") as file: # ファイルに行を書き込む file.write(f"{line}\n")今、残りの作業は、設定された訓練データフォルダと検証データフォルダへのパスを含む設定yamlをセットアップし、モデルのトレーニングを開始することです。注意(訓練フォルダと検証フォルダ内のフォルダ名はラベルと画像である必要があります)。それから、それをモデルのインスタンスの引数として渡し、トレーニングを開始します
path: C:/Users/msi/PycharmProjects/ANPR_Yolov8train: trainval: val# Classesnames:  0: ライセンスプレート

model = YOLO('yolov8n.yaml')result = model.train(data="config.yaml",device="0",epochs=100,verbose=True,plots=True,save=True)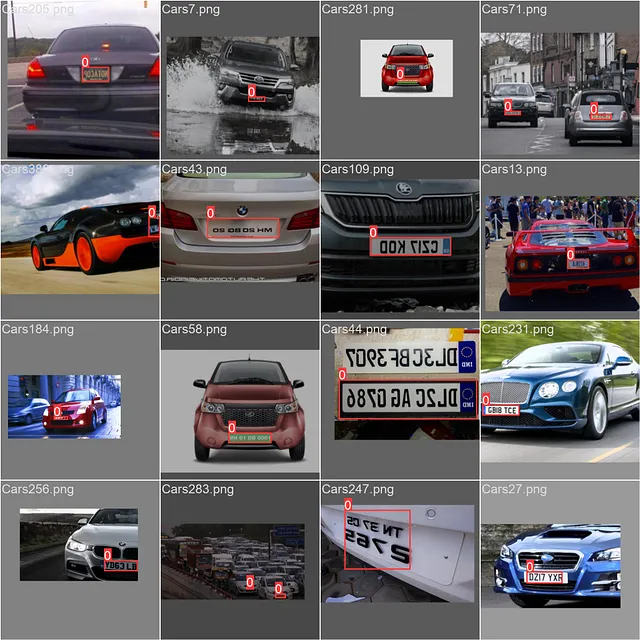
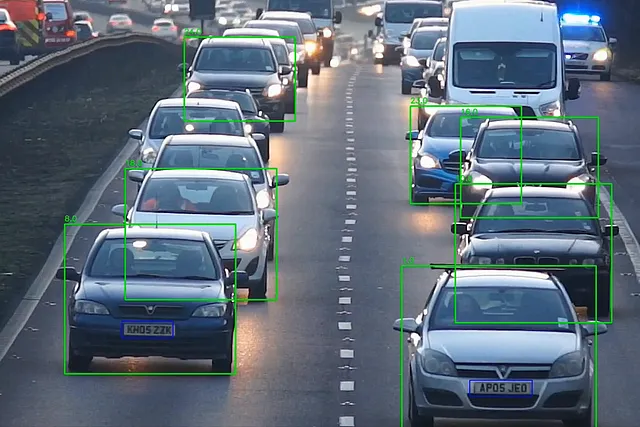
ライセンスプレートモデルがあるので、単にそれをロードしてビデオから切り抜かれた車の画像に使用するだけです。ライセンスプレートの切り抜きにはグレースケールを適用し、その内容を読み取るためにeasy_ocrを使用します
cropped_img = frame[int(y1):int(y2), int(x1):int(x2)]plates = lp_detector(cropped_img)for plate in plates[0].boxes.data.tolist(): if score > 0.6: x1, y1, x2, y2, score, _ = plate cv2.rectangle(cropped_img, (int(x1), int(y1)), (int(x2), int(y2)), (255, 0, 0), 2) lp_crop = cropped_img[int(y1):int(y2), int(x1):int(x2)] lp_crop_gray = cv2.cvtColor(lp_crop, cv2.COLOR_BGR2GRAY) ocr_res = reader.readtext(lp_crop_gray) if not ocr_res: print("プレートが検出されませんでした") else: entry = {'id': id, 'number': ocr_res[0][1], 'score': ocr_res[0][2]} update_csv(entry) out.write(frame) cv2.imshow('frame', frame) frame_nbr += 1update_csv関数は、車のIDとライセンスプレート番号をCSVファイルに書き込みます。これが、yolov8を使用したANPRパイプラインです
結論:
見たように、YOLOV8は、ネイティブのトラッキングとオブジェクト検出を提供することで、ANPRパイプラインの構築プロセスを簡素化します。
このリポジトリには、streamlitを使用してANPRアプリを構築したフルプロジェクトが含まれています:
GitHub – skandermenzli/ANPR_Yolov8
GitHubへようこそ – skandermenzli/ANPR_Yolov8への貢献は、GitHubでアカウントを作成することによって行われます。
github.com
We will continue to update VoAGI; if you have any questions or suggestions, please contact us!
Was this article helpful?
93 out of 132 found this helpful
Related articles