無料でGoogle Colab上でQLoraを使用してLLAMAv2を微調整する
無料でGoogle Colab上でQLoraを使用してLLAMAv2を微調整する

最近までGoogle ColabでシングルGPUで7Bモデルを無料でファインチューニングすることは夢でした。2023年5月23日、Tim Dettmersと彼のチームはファインチューニングされた量子化された大規模言語モデルに関する革命的な論文[1]を提出しました。
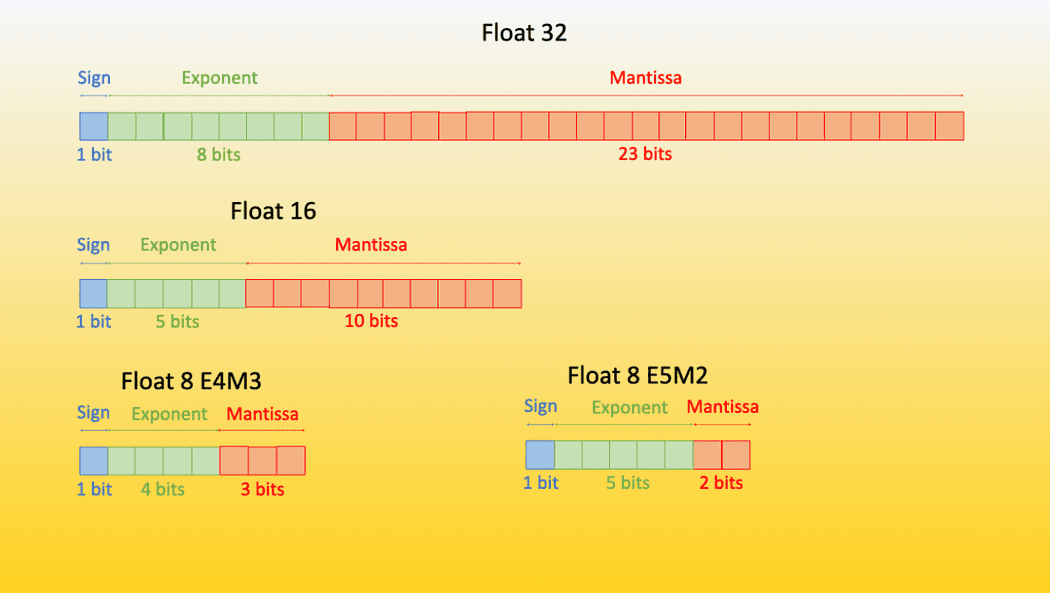
量子化モデルとは、トレーニングされたデータ型よりも低いデータ型の重みを持つモデルのことです。例えば、32ビット浮動小数点でモデルをトレーニングし、その重みを16/8/4ビット浮動小数点などのより低いデータ型に変換することで、モデルのパフォーマンスにほとんどまたは全く影響を与えないようにします。

- 「ビデオセグメンテーションはよりコスト効果的になることができるのか?アノテーションを節約し、タスク間で一般化するための分離型ビデオセグメンテーションアプローチDEVAに会いましょう」
- 「教科書で学ぶ教師なし学習:K-Meansクラスタリングの実践」
- オーディオSRにお会いください:信じられないほどの48kHzの音質にオーディオをアップサンプリングするためのプラグ&プレイであり、ワンフォーオールのAIソリューション
ここでは量子化の理論については詳しくは説明しません。詳細な理論については、Hugging-Faceの優れたブログ記事[2][3]や、Tim Dettmers自身による優れたYouTubeビデオ[4]を参照してください。
簡単に言えば、QLoraとは以下の意味です:
低ランク適応行列(LoRA)を使用して量子化された大規模言語モデルをファインチューニングすること
さあ、コードに入りましょう:
データの準備
大規模言語モデルは指示を受けるように設計されていることを理解することが重要です。これは2021年のACLの論文[6]で最初に紹介されました。アイデアは簡単で、言語モデルに指示を与え、指示に従ってタスクを実行することです。したがって、モデルをファインチューニングするためのデータセットは、指示形式である必要があります。もし指示形式でない場合は、変換することができます。
よく使われるフォーマットの一つは指示形式です。Alpaca Promptテンプレート[7]を使用します
以下は、タスクを説明する指示とさらなる文脈を提供する入力とがペアになった指示形式のデータの例です。要求を適切に完了する応答を書いてください。

### 指示:
{instruction}

### 入力:
{input}

### 応答:
{response}
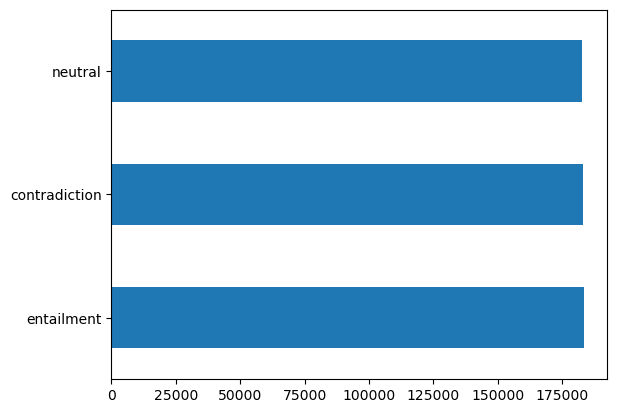
SNLIデータセットを使用します。これは2つの文とそれらの関係(矛盾、含意、または中立)を持つデータセットです。LLAMAv2を使用して文の矛盾を生成するために使用します。このデータセットは簡単にpandasを使って読み込むことができます。
import pandas as pd

df = pd.read_csv('snli_1.0_train_matched.csv')
df['gold_label'].value_counts().plot(kind='barh')

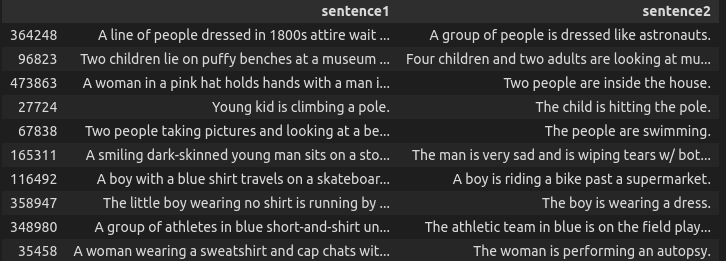
ここではいくつかのランダムな矛盾の例があります。
df[df['gold_label'] == 'contradiction'].sample(10)[['sentence1', 'sentence2']]

これで、矛盾する文だけを取り出してデータセットを指示形式に変換する小さな関数を作成できます。
def convert_to_format(row):
    sentence1 = row['sentence1']
    sentence2 = row['sentence2']ccccc
    prompt = """Below is an instruction that describes a task paired with input that provides further context. Write a response that appropriately completes the request."""
    instruction = """Given the following sentence, your job is to generate the negation for it in the json format"""
    input = str(sentence1)
    response = f"""```json
{{'orignal_sentence': '{sentence1}', 'generated_negation': '{sentence2}'}}
```
"""
    if len(input.strip()) == 0:  #  prompt + 2 new lines + ###instruction + new line + input + new line + ###response
        text = prompt + "\n\n### Instruction:\n" + instruction + "\n### Response:\n" + response
    else:
        text = prompt + "\n\n### Instruction:\n" + instruction + "\n### Input:\n" + input + "\n" + "\n### Response:\n" + response

    # we need 4 columns for auto train, instruction, input, output, text
    return pd.Series([instruction, input, response, text])

new_df = df[df['gold_label'] == 'contradiction'][['sentence1', 'sentence2']].apply(convert_to_format, axis=1)
new_df.columns = ['instruction', 'input', 'output', 'text']

new_df.to_csv('snli_instruct.csv', index=False)
ここには、サンプルデータポイントの例があります:
"以下は、タスクに対して追加のコンテキストを提供する入力とペアになったタスクを説明する指示があります。適切にリクエストを完了する応答を書いてください。

### 指示:
以下の文に基づいて、json形式でその否定形を生成することが仕事です。
### 入力:
ビーチで遊んでいるカップルと小さな男の子。

### 応答:
```json
{'orignal_sentence': 'ビーチで遊んでいるカップルと小さな男の子。', 'generated_negation': 'ビーチで一人で遊んでいる少女を見るカップル。'}}
```
今、データセットを正しい形式に持っているので、微調整を始めましょう。始める前に、必要なパッケージをインストールしましょう。加速、peft(Parameter efficient Fine Tuning)、Hugging Face Bits and bytes、transformersを使用します。
!pip install -q accelerate==0.21.0 peft==0.4.0 bitsandbytes==0.40.2 transformers==4.31.0 trl==0.4.7
import os
import torch
from datasets import load_dataset
from transformers import (
    AutoModelForCausalLM,
    AutoTokenizer,
    BitsAndBytesConfig,
    HfArgumentParser,
    TrainingArguments,
    pipeline,
    logging,
)
from peft import LoraConfig, PeftModel
from trl import SFTTrainer
Colabにフォーマットされたデータセットをアップロードして、それを読み込むことができます。
from google.colab import drive
import pandas as pd

drive.mount('/content/drive')

df = pd.read_csv('/content/drive/MyDrive/snli_instruct.csv')
簡単にHugging Faceのデータセット形式に変換することができますfrom_pandas メソッドを使用します。これはモデルのトレーニングに役立ちます。
from datasets import Dataset

dataset = Dataset.from_pandas(df)
私たちはすでにquantized LLamav2モデルを使用します。これはabhishek/llama-2–7b-hf-small-shardsから提供されています。ここでいくつかのハイパーパラメータと変数を定義しましょう:
# Hugging Faceハブからトレーニングしたいモデル
model_name = "abhishek/llama-2-7b-hf-small-shards"

# Fine-tunedモデル名
new_model = "llama-2-contradictor"

################################################################################
# QLoRAパラメータ
################################################################################

# LoRAアテンションの次元
lora_r = 64

# LoRAスケーリングのためのアルファパラメータ
lora_alpha = 16

# LoRAレイヤーのドロップアウト確率
lora_dropout = 0.1

################################################################################
# bitsandbytesパラメータ
################################################################################

# 4ビット精度のベースモデルのアクティベート
use_4bit = True

# 4ビットベースモデルの計算dtype
bnb_4bit_compute_dtype = "float16"

# 量子化タイプ(fp4またはnf4)
bnb_4bit_quant_type = "nf4"

# 4ビットベースモデルのネストされた量子化をアクティベート(ダブル量子化)
use_nested_quant = False

################################################################################
# TrainingArgumentsパラメータ
################################################################################

# モデルの予測とチェックポイントを保存する出力ディレクトリ
output_dir = "./results"

# トレーニングエポック数
num_train_epochs = 1

# fp16/bf16トレーニングを有効にする(A100の場合はbf16をTrueに設定)
fp16 = False
bf16 = False

# トレーニングのためのGPUごとのバッチサイズ
per_device_train_batch_size = 4

# 評価のためのGPUごとのバッチサイズ
per_device_eval_batch_size = 4

# 勾配を蓄積するための更新ステップ数
gradient_accumulation_steps = 1

# 勾配チェックポイントを有効にする
gradient_checkpointing = True

# 最大勾配ノルム(勾配クリッピング)
max_grad_norm = 0.3

# 初期学習率(AdamWオプティマイザー)
learning_rate = 1e-5

# バイアス/LayerNormの重みを除くすべてのレイヤーに適用するウェイト減衰
weight_decay = 0.001

# 使用するオプティマイザ
optim = "paged_adamw_32bit"

# 学習率スケジュール
lr_scheduler_type = "cosine"

# トレーニングステップ数(num_train_epochsを上書き)
max_steps = -1

# 線形ウォームアップのステップの比率(0から学習率まで)
warmup_ratio = 0.03

# 同じ長さのバッチにシーケンスをグループ化する
# メモリを節約し、トレーニングを劇的に高速化します
group_by_length = True

# X回の更新ステップごとにチェックポイントを保存する
save_steps = 0

# X回の更新ステップごとにログを記録する
logging_steps = 100

################################################################################
# SFTパラメータ
################################################################################

# 使用する最大シーケンス長
max_seq_length = None

# 効率を向上させるため、複数の短い例を同じ入力シーケンスにパックする
packing = False

# GPU 0でモデル全体をロードする
device_map = {"": 0}
これらのほとんどは、デフォルト値を持つかなり直感的なハイパーパラメータです。詳細については、常にドキュメントを参照できます。
BitsAndBytesConfigクラスを使用して、4ビットのファインチューニング用の設定を簡単に作成できます。
compute_dtype = getattr(torch, bnb_4bit_compute_dtype)

bnb_config = BitsAndBytesConfig(
    load_in_4bit=use_4bit,
    bnb_4bit_quant_type=bnb_4bit_quant_type,
    bnb_4bit_compute_dtype=compute_dtype,
    bnb_4bit_use_double_quant=use_nested_quant,
)
4ビットのBitsAndBytesConfigとFine-Tuning用のトークナイザを使用して、ベースモデルをロードできます。
tokenizer = AutoTokenizer.from_pretrained(model_name, trust_remote_code=True)
tokenizer.pad_token = tokenizer.eos_token
tokenizer.padding_side = "right"

model = AutoModelForCausalLM.from_pretrained(
    model_name,
    quantization_config=bnb_config,
    device_map=device_map
)
model.config.use_cache = False
model.config.pretraining_tp = 1
LoRAの設定を作成し、トレーニングパラメータを設定できます。
# LoRAの設定をロード
peft_config = LoraConfig(
    lora_alpha=lora_alpha,
    lora_dropout=lora_dropout,
    r=lora_r,
    bias="none",
    task_type="CAUSAL_LM",
)

# トレーニングパラメータを設定
training_arguments = TrainingArguments(
    output_dir=output_dir,
    num_train_epochs=num_train_epochs,
    per_device_train_batch_size=per_device_train_batch_size,
    gradient_accumulation_steps=gradient_accumulation_steps,
    optim=optim,
    save_steps=save_steps,
    logging_steps=logging_steps,
    learning_rate=learning_rate,
    weight_decay=weight_decay,
    fp16=fp16,
    bf16=bf16,
    max_grad_norm=max_grad_norm,
    max_steps=max_steps,
    warmup_ratio=warmup_ratio,
    group_by_length=group_by_length,
    lr_scheduler_type=lr_scheduler_type,
    report_to="tensorboard"
)
ここで、HuggingFaceから提供されるtrlのSFTTrainerを使用してトレーニングを開始できます。
# 教師ありファインチューニングのパラメータを設定
trainer = SFTTrainer(
    model=model,
    train_dataset=dataset,
    peft_config=peft_config,
    dataset_text_field="text",  # データセットのテキスト列
    max_seq_length=max_seq_length,
    tokenizer=tokenizer,
    args=training_arguments,
    packing=packing,
)

# モデルをトレーニング
trainer.train()

# トレーニング済みモデルを保存
trainer.model.save_pretrained(new_model)
これにより、上で設定したエポック数のトレーニングが開始されます。モデルのトレーニングが完了したら、セッションを再起動する必要があるため、ドライブに保存しておくことを確認してください。モデルはzipとmvコマンドを使用してドライブに保存できます。
!zip -r llama-contradictor.zip results llama-contradictor
!mv llama-contradictor.zip /content/drive/MyDrive
Colabセッションを再起動すると、再びセッションに移動できます。
!unzip /content/drive/MyDrive/llama-contradictor.zip -d .
ベースモデルを再度ロードし、ファインチューニングしたLoRA行列とマージする必要があります。これは、merge_and_unload()関数を使用して行うことができます。
tokenizer = AutoTokenizer.from_pretrained(model_name, trust_remote_code=True)
tokenizer.pad_token = tokenizer.eos_token
tokenizer.padding_side = "right"

base_model = AutoModelForCausalLM.from_pretrained(
    "abhishek/llama-2-7b-hf-small-shards",
    low_cpu_mem_usage=True,
    return_dict=True,
    torch_dtype=torch.float16,
    device_map={"": 0},
)

model = PeftModel.from_pretrained(base_model, '/content/llama-contradictor')
model = model.merge_and_unload()
pipe = pipeline(task="text-generation", model=model, tokenizer=tokenizer, max_length=200)
推論
モデルをテストするには、上記で定義したプロンプトテンプレートに入力を単純に渡すことができます。
prompt_template = """### Instruction:
以下の文が与えられた場合、json形式でそれに対する否定文を生成するのがあなたの仕事です
### Input:
{}

### Response:
"""

sentence = "The weather forecast predicts a sunny day with a high temperature around 30 degrees Celsius, perfect for a day at the beach with friends and family."

input_sentence = prompt_template.format(sentence.strip())

result = pipe(input_sentence)
print(result)
出力
### Instruction:
以下の文が与えられた場合、json形式でそれに対する否定文を生成するのがあなたの仕事です
### Input:
The weather forecast predicts a sunny day with a high temperature around 30 degrees Celsius, perfect for a day at the beach with friends and family.

### Response:
```json
{
  "sentence": "The weather forecast predicts a sunny day with a high temperature around 30 degrees Celsius, perfect for a day at the beach with friends and family.",
  "negation": "The weather forecast predicts a rainy day with a low temperature around 10 degrees Celsius, not ideal for a day at the beach with friends and family."
}
```
有用な出力をフィルタリングする
モデルは、応答が生成された後もトークンの制限により予測を続けることが多々あります。この場合、必要なのはJSONの部分をフィルタリングするポストプロセッシング関数を追加することです。これは簡単な正規表現を使用して行うことができます。
import re
import json

def format_results(s):
  pattern = r'```json\n(.*?)\n```'

  # 文字列内のJSONオブジェクトのすべての出現箇所を検索します
  json_matches = re.findall(pattern, s, re.DOTALL)
  if not json_matches:
    # 2番目のパターンを検索します
    pattern = r'\{.*?"sentence":.*?"negation":.*?\}'
    json_matches = re.findall(pattern, s)

  # 最初に見つかったJSONオブジェクトを返します。一致が見つからない場合はNoneを返します
  return json.loads(json_matches[0]) if json_matches else None
これにより、モデルがランダムな出力トークンを繰り返す代わりに、必要な出力が得られます。
サマリー
このブログでは、QLoraの基礎、QLoraを使用してColab上でLLama v2モデルをファインチューニングする方法、インストラクションチューニング、およびAlpacaデータセットからのサンプルテンプレートについて学びました。
参考文献
[1]: QLoRA: Efficient Finetuning of Quantized LLMs, 23 May 2023, Tim Dettmers et al.
[2]: https://huggingface.co/blog/hf-bitsandbytes-integration
[3]: https://huggingface.co/blog/4bit-transformers-bitsandbytes
[4]: https://www.youtube.com/watch?v=y9PHWGOa8HA
[5]: https://arxiv.org/abs/2106.09685
[6]: https://aclanthology.org/2022.acl-long.244/
[7]: https://crfm.stanford.edu/2023/03/13/alpaca.html
[8]: Colab Notebook by @maximelabonne https://colab.research.google.com/drive/1PEQyJO1-f6j0S_XJ8DV50NkpzasXkrzd?usp=sharing
Ahmad Anisは、現在redbuffer.aiで働いている情熱的な機械学習エンジニアおよび研究者です。彼は日中の仕事以外でも、積極的に機械学習コミュニティに参加しています。彼は、オープンサイエンスに専念する非営利団体であるCohere for AIの地域リードを務めており、AWS Community Builderでもあります。AhmadはStackoverflowでも積極的な貢献者であり、2300以上のポイントを持っています。彼はShap-E by OpenAIを含む多くの有名なオープンソースプロジェクトに貢献しています。
We will continue to update VoAGI; if you have any questions or suggestions, please contact us!
Was this article helpful?
93 out of 132 found this helpful
Related articles


